 |
GREATDANELADY.COM Linda Arndt ~ Canine Nutritional Consultant Email: |
 |
|
Ear Taping Instructions |
|
Print out for your vet before cropping procedures. Step By Step Please read first, have all materials together and parts made. Practice on a stuff animal before actually doing. There are illustrations as well as actual photos of how to tape ears, at this website. Materials: Use: TORBOT Liquid Bonding Cement, contains
Latex - 4 oz can $13.94 - this is now what replaces the
old Skin Bond Cement. Also order TORBOT TACaway
Adhesive Remover. To order on line: http://ostomycaresupply.com Use cotton, paper towel or a piece of sponge or any light weight soft formable material to make the pillow. Size varies according to size of the dogs ear. ( see A.) Use one inch cloth tape, porous and soft, but strong. NEVER use masking tape, waterproof tape or duct tape or they will have a severe reaction or the ear will rot off! In the old days we used metal corset stays or plastic corset stays, or they may be called bones (1/4 or 1/2 " wide) . Now you can use the black 1/4" electrical zip ties that you can get from a hardware, electrical store or Home Depot, Lowes, Menards etc. These work perfect and you can use 2 -4 depending on the width needed for the age of the puppy. NO wooden sticks please. The Purpose of Splinting The purpose for this process is to splint the ear using the least amount of materials to get the maximum benefit. Keeping them as comfortable as possible considering the process is pretty unnatural. Preparing the Stays The length of the stay should be from the tip of the ear to just
above the button inside the ear. ( see B. ) Now make a little pillow, cover it with tape.( see C.) This will be glued directly on top of the little button inside the ear. The size depends on the age of the puppy. I am guestimating approximately 1 1/2"-2" on younger puppies and it will increase according to the size of the dog. Get your tape cut ahead of time and put them out of the reach of the puppy. You will need 2 pieces to go around the base of the ear approximately 7-8" long. You will need 2 pieces to make a brace, approximately 7-9" long. Here We Go This is where all that table training has paid off. This takes at least two people, three are better for beginners!. 1. Paint surgical glue up the inside of the ears down to the button in the ear. Let it set a minute to get tacky. 2. While waiting, paint glue on one side of the pillow, and the side of the stays which will go inside the ear (the glue goes on the side with the short tape. You only get one shot to do this right because it is next to impossible to pull the two apart if the are stuck in there wrong. Practice first with no glue on the tape. I suggest you practice on a stuff animal before the real thing. 3. Make sure the dogs head is looking straight ahead -NOT tipped up or down or the ears will not be set right. 4. With top head plane level, pull the ear up gently so it is straight. (see D.) Start at the bottom and set the glue covered stay just above the button and then attach it up the ear to the very top folding the extra piece of tape over the top and securing. 5. Now glue the pillow in the ear. Center the pillow over the button, not down in the ear.( see E.) 6. Pull upward keeping the tension on the ear.(not so tight their eyes are slanted). 7. While you are facing the puppy, place the tape on the pillow and then wrap tape (not too tightly) around the base of the ear. (see F.) Make sure you do not go against the grain, there is a flap of skin
there that needs to fold in it's natural direction.( see G.) Do not
tape too tightly or it will swell and then all kinds of problems
9. Provided there is no odor, swelling or sores, you will see they
start to come down themselves in a few days. I leave them down a day
or two, cleaning them with soap and water afterwards or before retaping.
Make sure there is no moisture under that flap of ear skin that is
on the front of the dogs ear, or it will develop bacterial infection
or fungus.
The length of time for taping an ear is individual based on the type of ear leather, the cut, the particular animal so do not give up. I have some dogs ears stand by 4 months and others we taped until they were older. Normally once they get past the teething stage at 6-7 months the ears start to stand. When properly taped they will remain on ears for as long as 7 - 10 days. Always check daily for discharge or odor. Let the ears rest at least 24 hours to air out before each retaping. *The drawings and some of the explanation
are taken from an article by Phyllis Lockwood of Willowrun Kennels.
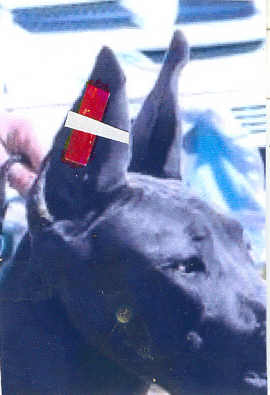
Part two Around 5 months of age, the years are generally up, but with floppy tips. They will remain soft at this age due to teething from 5-7 months of age. Sometimes we have to support the tips at this age and it is done with the following method. Take two Large "Breathe Rite" nasal strips (no other brand works!). Put one on top of each other, for double thickness and support. Make sure the bottom one still has the sticky side available to glue in the ear. Red strip represents the Breathe Right nasal strip in photo. Paint Skin Bond Surgical Cement on the sticky side of the doubled up Breathe Rite Strip and let dry a minute or two. Paint Skin Bond Surgical Cement vertically on the inside of the dog's ear, making sure the Breathe Rite Strip will be place at the center of where the ear folds over or breaks - the weak spot - so there is support top and bottom of the break/fold. Let the glue set up a minute. Then pull the dog's ear straight up and press the Breathe Rite Strip in the ear (represented below in red). The wrap a 1 - 1 1/2 piece of cotton tape around it slightly cupping the ear for support (represented by white strip).
Have a cookie handy to distract dog from shaking the head when finished and praise the puppy for a job well done!. Here is a pencil drawing of taping, note E. illustration where the button is located in the middle and the pillow goes below it. |
|
|
|
|About Us | Album
| Interview | Articles
| Links | Breeders
Showcase | GREAT Great Danes
| Linda's Artwork
| Email: Copyright © 2002-2003 GREATDANELADY.COM |